Headlight Cleaning
140,000 miles, 12th December 2012
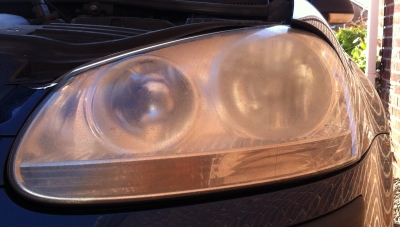
The headlights on my, now over 8 year old VW Golf Mk 5 had been looking a bit dirty for a while now. It wasn't that they just needed a wipe with a sponge. This dirt was engrained giving the headlights an unflattering aged yellow/foggy appearance. Also, the surface of the headlight was no longer smooth to the touch. I hadn't really noticed but thinking back, I think it was also starting to reduce the range of my car's headlights at night.
After doing a little research on the internet I discovered that the yellowing was caused by the UV rays in sunlight. This affects the surface layer of the plastic headlight causing it to turn yellow. The only cure was apparently to rub away that surface layer of yellowed plastic. Fortunately, the affected layer is only in the region of a fraction of a millimeter.
I found a bit more information online on how to fix this. The repair is quite cheap requiring only a few bits of very fine grade wet-and-dry sandpaper, a bit of glass/plastic polish and no more than approximately 60 minutes of your time. It is not a difficult job and produces amazing results.
Cleaning the headlights

Tools of the job. A few bits of wet and dry sandpaper,
water and a cloth.
Click on photo to enlarge.
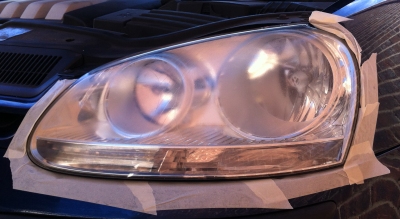
You don't need to remove the headlights to do this job. You can if you want but you don't need to and I didn't. If not removing the headlights I'd recommend you use a little masking tape to protect the paintwork just in case your fingers accidentally slip off the headlight whilst sanding.
You only need to use small bits of sandpaper, say 1 inch by 2 inch. This is sufficient and helps ensure that you only sand the headlight and not the surrounding paintwork. I found I could purchase 3 sheets of different grade wet and dry sandpaper on eBay for about £3.50. Bargain!
I started with 600 grade wet-and-dry sandpaper. The lower the grade, the less time it will take you to rub away the old aged layer of plastic but the more time you will need to use intermediate grades to rub out all the scratches you have added. Basically, the worst your headlights look, the lower the grade of sandpaper you should start with. If your car's headlights are not as bad as mine, start with 1000, 1500 or possibly even 2000 grade.
Remember to soak your sandpaper for a few minutes before using and rinse frequently during use. Sand the whole surface of the headlight with light, even pressure. Try to sand the whole area evenly by working on a small portion of the headlight at a time and working your way across the whole headlight. I found some reports online stressing the need to only sand either vertically or horizontally but never in a circular motion. I wasn't sure why they advised against using a circular motion and ended up doing so because I found this easier.
Whilst sanding, especially with the first courser grades, your sanding will cause the water to turn milky. Just wipe this away with a cloth and rinse your sandpaper. With this first, relatively course grade of sandpaper, the surface of the headlight will look dulled and matt-looking caused by all the tiny scratches you've added. Don't worry. As you repeat this process with the finer grades of sandpaper and finally the glass cutter/polish, you will progressively rub these out.
After each pass of the headlight, switch to a higher grade of sandpaper and repeat the process. You want to finish with say 3000 grade. I started with 600, then switched to 1000, 2000, 2500 and finally 3000 grade. Probably 1000, 2000 and 3000 would have been sufficient. By the time you get above 2000 grade you should feel and hear the difference. The sandpaper should slide across the surface rather than rub. Also the sanding should be quieter and the the water will no longer turn milky. Just rub your fingers across the headlight surface. It should be perfectly smooth. You shouldn't be able to feel any scratches or rough spots.

The Glass Cutter and Glass Polish I used to
restore my headlight's 'as new' appearance.
Click on photo to enlarge.
After sanding with the first couple of grades of sandpaper the headlight should already begin to look better. The yellow appearance should have gone but the surface may still look a little dull. This is caused by the remaining fine scratches on the surface. Wet and Dry sandpaper can only get you so far but to get that 'as-new' look you need to use a liquid abrasive/polish. I already had some glass cutter but you could perhaps use T-Cut. I've even heard of toothpaste and Brasso being used.
Finally, after using the liquid abrasive, apply some polish. This will really restore your headlight's as-new appearance and will help protect the newly revealed plastic against further UV damage.
The Results
The results speak for themselves.
Like I said, previously I hadn't been aware that the headlights had become less-bright. I have to be honest and admit that after cleaning, they are not a lot brighter but I do think they are a little more so. Also, the dipped-beam cut-off line is much more precise now. That said, the whole reason for doing this work was to make the headlights look less-old and yellow and they definitely look as good as new now. I'm very happy.
Update: 158,000 miles, 31st October 2014
Nearly 2 years after their first restoration my Mk V's headlights were starting to look a little bit grubby again and so with winter approaching I decided to restore them again. Same technique as before, it didn't take me as long this time as I was more confident. Before starting this time however, I invested approx £11 (inc P&P) in a 296ml bottle of Meguiar's Headlight Protectant to apply at the end. Time will tell if this makes much of a difference. I will report back, hopefully in a few years time!


